Welcome to my code tutorials page!
On this page you'll find some code snippets that I've written or cobbled together, along with instructions on how to use them. Most of them are annotated to hopefully make it easy to understand what each part does (so you can edit them to your liking), but if anything's unclear or if you need any help with using the codes, feel free to hit me up on Discord (nachtkern) and I'll see if I can help you!
FAQ:
Q: Do I need to credit you if I use any of these codes?
A: No.
Q: Can I copy code you've used on other parts of your website?
A: Sure, but it might not be my code, either. Other than copying the direct layout of my website, I don't really care.
Q: Do I need to understand any html/css/javascript to use these codes?
A: Some basic understanding of html is necessary - like being able to find and open your .html file, and some familiarity with what you're looking at in there to be able to edit it. You don't need to know css or javascript, but it does help if you want to edit anything. The codes as is are completely unstyled, so you can apply your own css if you want.
Q: How did you do ___ on your website?
A: You can take a look if you right-click on the page and select "view page source". For the bits of code shown here, I've also left annotations on the page sources of their live previews!

TAROT PAGE
This code will allow you to make a page on your website that generates a random tarot card with a button! It can draw an upright or inverted card, and displays a picture of the card, its name, and a description. I referenced @coffinthusiast's tarot page when writing this code!
CODE:
Put the snippet above somewhere into the <body> of your page. The three <div>s named "tarot_image", "tarot_title" and "tarot_meaning" will have their content replaced with a picture, the card's name, and a different description depending on the orientation of the card, respectively. The <button> runs the function that generates the card.
You can put these elements anywhere into the <body> and style them however you like (for example by adding a class and editing its css), just so long as you don't change the ID name. If you put any content in the <div>s, it will be replaced on running the function, so you can put placeholder content in there if you want.
The snippet above is the script that generates the card. Put it at the end of your <body>, right above the </body> tag. This sample code only has four cards in it and placeholder text; you'll have to add the remaining cards and their descriptions yourself.
After inserting the code, make a folder somewhere on your website containing the images for your tarot cards. Make sure your tarot cards all have the same name and are numbered 0 and up, in the same order as you listed the tarot cards in the script, for example "tarot_0.jpg", "tarot_1.jpg", "tarot_2.jpg"... etc. Then make sure the path and filename used in the script matches the path and filenames you used for your images.
That's about all there is to it! Good luck!
CODE PREVIEW | PREVIEW PAGE SOURCE | EXAMPLE
GALLERY WITH BUTTONS
This bit of code is to add a simple gallery to your page. It has a container in which it displays an image, and buttons that load a different picture in that container when clicked. Images in the gallery have alt text; a guide on alt text can be found in this article: Write helpful Alt Text to describe images.
CODE:
First, copy the two <div>s and their content into the html of your page's <body> somewhere. The first <div> is the container your active gallery image is in, and you should add an image source (the direct link/path of your image, ex "/imgs/gallerypic1.png" or "https://filehost.web/imgabc.jpg") and alt text to it. The second <div> is the container with your buttons in it. Inside of each button, set a thumbnail image for the picture it's meant to display. The <button>s run a function called setGallery(), which will replace the image source and alt text of the active gallery picture. These functions are numbered up from 0, make sure they keep counting up as you add more images and buttons to the page.
As is, it's a very bare-bones gallery without any styling: the containers both have a class added so that you can style those classes (and the elements within) using css, or you could add a style attribute to them and do it within your html.
Next, copy this piece of code and add it at the end of your <body>, right above the </body> tag. This is the code block with the function that displays the different gallery images. Add the images sources and alt text for all your gallery images into the list called "gallerypics", making sure these are in the same order that your buttons for them are numbered.
The function setGallery() looks for the image with the id "gallerypic", and then changes the source url and alt text for it to match an item from the list of gallery pictures, at the index number from the button.
The last line in the function, window.location.href='#gallerycontainer';, is optional: this scrolls the page to the top of the container the gallery picture is in. This can be useful if you have a lot of images in your gallery and don't want to make the viewer to have to manually scroll around each time they click on an image to view, but might be annoying in other situations. If you don't need it, or are styling your page to keep the buttons near the displayed image in some other way (ex. by giving your buttons container a max height, and making it scroll on overflow), take this line out.
That's all there is to your very own gallery. Happy coding!
RANDOM ITEM GENERATOR
This bit of code is the basis I use for my random item generators! You could use it to generate a random word or picture, whole pieces of html, or with a bit of extra work and editing, you could even use it for composite randomness or easter eggs in your website.
CODE (SINGLE ITEM):
Put the snippet above somewhere in the <body> of your page. The randomized item will be placed inside of the <div>, and replace any content inside of it. It has placeholder text in it right now, but you can put anything you want in there, or leave it empty if you want it to be hidden before it's generated. The <button> runs the function that generates the random item!
You can put these elements anywhere inside of the <body> and style them however you like (for example by adding a class and editing its css), just so long as you don't change the <div>s ID name, or make sure that it's the same name used in the <script> later down.
The snippet above is the script that generates the random item and inserts it into your page. Put it at the end of your <body>, right above the </body> tag. Right now it has a couple of delicious fruits in it, but you can put anything you want in there, really, including images or whole pieces of html. Just be careful not to break the list with " marks within the items: either use character codes instead (see: here), or use single ' marks inside of the items' inner html, like this: "<img src='source'>".
Once you've done all of that, it should look something like this:
This is placeholder text!
CODE (MULTIPLE ITEMS):
You can make a random generator with multiple components by editing the script a little bit. Like with the example for one item, you replace the inner html of a <div> with the randomized item on clicking a button, but this time you make multiple lists in the <script> part of the code and roll a different random index number for each list. After doing that, you combine the different generated items into a single string again, which is inserted into the <div>. Make sure to give all your lists and variables different names from each other, and to use the correct names when piecing your phrase together. If your page has multiple randomizers, give those different names, too.
Once you've done all of that, it should look something like this:
This is placeholder text!
OPTIONAL CODE:
If you want there to already be a randomized item once the page loads, find your <body> tag and add onload="goRandom()" into the tag itself. You could even leave out the <button> if you just want the item to be randomized per visit.
There's much more you could do with randomizers and this is just the bare-bones basics of it, but I hope it makes for a good starting point!
CODE PREVIEW | PREVIEW PAGE SOURCE | EXAMPLE A (on refresh), EXAMPLE B (on button)
SHUFFLED BLINKIES
This is a piece of code to put your blinkies (or stamps, userboxes, buttons, links, or anything else you can think of, really) in a random order.
CODE:
First, put a named <div> somewhere in your body where you want the images to go.
This is the script that contains the images you want to shuffle, and the function that does it. Put it at the end of your <body>, right above the </body> tag.
You can put as many things into that list as you want, just make sure to enclose each item in " marks and to put commas behind new items. You'll have to either host the images on your own website or use an image host, and then replace those "img1.png" etc. with the paths/urls to your images.
The code shuffles the order of the items in the list and then takes a specified amount of them (blinkamt in the code) from the top to insert into your page. The number of items to display can be smaller than the amount of images actually in the list, if you want there to be some variation each visit - otherwise just make it the same as the number of items in your list. By default, the items are joined with a space between them, but you can edit that too if you want something else (or nothing) between them.
Finally, find your <body> tag and call the function to shuffle your images there by adding onload="shuffleBlinkies()" into it!
That's about it! If you want to shuffle multiple things on a page, just add another <div> with a different ID, make another list of items, and repeat those steps in shuffleBlinkies() for them. Make sure to give any new <div>s, lists, or functions different names from the ones you've already used, or your code will break. Good luck!
CODE PREVIEW | PREVIEW PAGE SOURCE | EXAMPLE
RANDOM BACKGROUND
These two bits of code will pick a random background from a set list of options. The first version works with numbered image files (which works well if you're hosting them yourself); the second version works with a list of images that can have any filename/source url, but all have to be listed out individually in your page code.
CODE (NUMBERED FILENAMES):
The snippet above is the code that generates the random background. Put it in your html file's <head>, right above the </head> tag.
You'll also need to host your background images somewhere, and make sure they have the same filename and path, other than being numbered starting at 0. So for example, put them in the same folder on your Neocities, and name them something like "background0.jpg", "background1.jpg", "background2.jpg"... etc.
Once you've done that, edit the above code to match the number of backgrounds you have, and to match the path and filenames of your background images.
Background images repeat by default, so as is the code works best with a tiled background, but you can set the images to behave differently (ex. stretch out) through editing your page's css.
Now that your script itself is done, you just have to call it! Find your <body> tag and add onload="randomBG()" into the tag itself. This will run the function in your script when your body loads. It'll run any time the page is refreshed and the body is reloaded!
CODE (LISTED FILENAMES):
This bit of code generates the random background. Put it in your html file's <head>, right above the </head> tag. Unlike the numbered version, you can use images with any filenames, hosted anywhere, in any combination, so long as you list them all out individually.
And like the numbered version, you will still have to activate your function! So again, find your <body> tag and add onload="randomBG()" into the tag itself, to make the script run on loading/refreshing the page.
OPTIONAL CODE:
Hate surprises? Instead of (or besides) calling the function when loading the body, you can also call it with a button.
CODE PREVIEW (NUMBERED) | PREVIEW PAGE SOURCE | EXAMPLE (NUMBERED) (you are here!) | EXAMPLE (LISTED)
BACKGROUND SELECTOR
These bits of code set the background of the page on clicking or hovering over a picture! If you have a page for your graphics, this would be a good way to let people preview the backgrounds you've made.
CODE (ON CLICK):
Put the snippet above somewhere on your page, in the <body>, and replace the image sources with your image urls: these are buttons showing the background images. These ones are styled to be 100 x 100 px big, but if you want them to have some other size or shape, you can edit that, obviously. The images are set as backgrounds to the buttons, and also behave like backgrounds: if the image is smaller than the button size, it will repeat itself by default, and if it's bigger, it will be cut off. If you want them to behave differently, you can style them with css.
The buttons run a function called changeBG() on click, and the functions should all be numbered counting up from 0. The example has three buttons, but you can add as many as you want to your page, just make sure to number them accordingly!
Next, add this code at the end of your <body>, right above the </body> tag. This is the script with the function that actually changes the backgrounds! You'll have to edit that list with all of the image sources you're using, in the same order as your buttons are numbered. Javascript starts counting at 0, so the function changeBG(0) references the first item in bgs_list... changeBG(1) references the second item... and so on. Once you've done all that, your background buttons are ready to go!
CODE (ON HOVER):
If you want the background to change on hovering over the images instead of clicking on them, all you need to do is change onclick in the button to onmouseover.
OPTIONAL CODE:
You can style your page to have a default background before any of the buttons are clicked/hovered, but you could also set it to a random option from the list. To do that, add the above function to your <script> block. This bit of code picks a random index number from your list of backgrounds, then sets the page background to that on loading the page. If you rename your backgrounds list to something else, make sure to rename it in this function, too!
Then call the function inside of your <body> tag, by adding onload="randomPreview()" to it. That's all!
CODE PREVIEW | PREVIEW PAGE SOURCE | EXAMPLE
RANDOM COLOR
This is a guide for generating a random hex code color and setting it on an element or a page background!
CODE:
First, copy the above code and add it into your page's <head>, right above the </head> tag. This is a function that first generates a random hex code by generating six different characters (from 0 to F) and stringing those together, and then styles the background color of the body with that hex code, as well as the background color of an element with the id "colorviewer". You don't need to do both (or either) though: depending on what you want to use a random color for, you could switch these lines out for something totally different.
Now that you've made a function that generates a random color and sets it to the background, you need to call it! Add a button like this somewhere to your page to re-roll the hex code and change the color of your background.
If you want to already set a random color on loading the page, find your <body> tag and add onload="changeBGColor()" directly into the tag. This'll call the function upon loading or refreshing the page.
That's about all there is to it! One final note: the colors generated this way are fully random, so you should take that into account and make sure your page is still readable even with random colors. If you set the background of the page or an element and you put text on it, you should make sure that text has some sort of fixed background or outline with enough contrast, else you risk your random color being too similar to the text and making it unreadable.
EASTER EGGS
Easter eggs are secrets hidden somewhere in your website. There's tons of different ways to do this, such as
A note in advance: a lot of the types of easter eggs I'll show you involve styling elements. My tutorials don't cover css, so I'll be adding the styling to the html directly, like this: <text style="cursor:pointer">this text has a styled cursor!</text>... but generally speaking, it's recommended to instead add a class and then style your classes in the css file, especially if you re-use the same styling or have lots of different things to style. It'll save you work, makes for a cleaner html file, and gives you a bit more freedom with it!
HOVER TEXT:
The most straightforward way to add a hidden message to something is to add a title attribute to an element, which shows a message on hover. It doesn't have to be a text element specifically, you can add a title to nearly any kind of element, including images (<img>), links (<a>), whole paragraphs (<p>), and the non-specific element <div>. The <text> tag is useful for applying something only to a single phrase or a small portion within a bigger text, so you can hide away your easter eggs in really
INVISIBLE TEXT:
There's two main ways to make something invisible: the first method is to make it the same color as your background color. So if you had a white background, and you put white text on it, someone would only be able to read it by selecting the text.
The second method is by setting the opacity to 0, which makes something completely see-through... including the selection. Opacity is a value between 1 (fully visible) and 0 (fully transparent) - it can also be used to make something semi-transparent, for example by setting the opacity to 0.5. I wouldn't recommend making text completely see-through if you want anyone to actually be able to find your easter eggs, but you could use semi-transparency for, say, a ghost image!
Alternatively, you could make an invisible element reveal itself when clicked on. You do this by styling it to have its opacity set to 0 (or a low number, like 0.1), giving the element an ID, and then adding onclick="document.getElementById('ID NAME HERE').style.opacity = 1" to it (or making it run a function that does the same thing in your <script> block). In the example I've used a button, but like title, onclick can be added to different kinds of elements, including pictures and text. Because something fully invisible is really hard to spot, I recommend adding a clue there's something to find/click on, for example with hover text or changing the cursor style.
HIDDEN LINKS:
You can hide a link inside of your text by styling it to look the same as your regular text. Usually, a link has a different color from the main text, and its text-decoration is set to underline, so those are the two main things you'll have to change to hide it from view. Hovering over a link normally also changes your cursor to pointer
... And on the flip side, you can prank people with
Again, if you want visitors to actually find your easter eggs, you probably shouldn't hide them *too* well! But I think it's useful to know how the cursor changes its shape to indicate different things, like that something can be clicked on, and you can use this to your advantage both to hide secrets or leave clues. W3Schools has a list of cursor styles and a demo page where you can try them out.
RANDOM TEXT:
A fun, but slighly more complicated type of easter egg is making it so that something on your page only shows up occasionally, or has a small chance of being different. We're doing this with javascript, so first add the element you want changed somewhere into your page, and give it a unique ID.
This is the code to sometimes change your element. Put it in your html file's <head>, right above the </head> tag.
The function first generates a random number out of 10, and then if that number is higher or equal to 8, it looks for an ID and replaces its contents with something else. The odds there are 2/10, or 20%, but you can change those numbers to have different odds if you want to make your easter egg more or less likely to appear. You can find a list of javascript comparisons here, if you want to change what it checks.
The example uses a <text> element, but you can also do this with other things, like images, divs, or buttons. And while this example replaces a default text, if you use an empty element (like so: <text id="easter_egg_text"></text>) you can add an easter egg that spawns out of thin air, rather than replacing something that was already there.
And finally, you'll have to call your function! Find your <body> tag, and add onload="loadEasterEgg()" into it. This makes the function run when the body is loaded, adding a chance to change your element any time the page is visited or refreshed.
IMAGE MAPS:
Image maps are a way to add effects to just a portion of an image. You could use these to hide a link, message, animated effect, or button inside of a picture; you could even add multiple effects to different parts of the same picture. To be entirely honest, W3Schools has written a better tutorial for this than I could, so you should read that one here: HTML Image Maps.
But to go over it, you first add a picture to your page with <img> and set a source for it as you would normally. Then add usemap="#secretmap" to it (or whatever you want to call your map), to link it to an image map. Then you'd make a <map name="secretmap"> element with the same name, and within your <map> tags, you can define the <area>s that you want to add an effect to, like in the example above.
For each area, you must define a shape (rectangle, circle, or polygon) and coordinates of that shape. Coordinates are numbers that (mostly) come in pairs, with the first number being the amount of pixels from the left, and the second being the amount of pixels from the top. A rectangle uses two pairs: the first defines the top left corner of the area, and the second the bottom right corner. A circle uses three numbers: the first two are the coordinates of the center of the circle, and the third number is the radius of the circle in pixels (a radius of 33 pixels would mean your circle is 66 pixels wide). Finally, a polygon is used for complex shapes, and its coordinates are number pairs marking each corner of the shape.
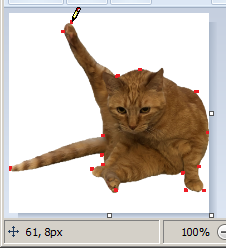
Mapping out coordinates can be kind of a pain, especially if there's a lot of them! I recommend opening up your image in MS Paint (or similar program) and marking where each coordinate would be; hovering over those points will display the coordinates of that point at the bottom of the window, so you can type them out. Be sure to put them in the right order, too: I recommend starting at the top, and going clockwise around the area's shape.
And once you've done all of that... you can add whatever effect you want to that area! Easy would be to add a title or href (link), but you could also use a mouse event such as onclick or onmouseover creatively for secret buttons or dynamic animations (see section below). For example, you could make the page play a sneeze sound effect when clicking on a person's nose, or you could replace the image source to a blinking version when hovering over someone's eyes. You could make a whole point-and-click game on your page with image maps and enough patience!
OTHER IMAGE MANIPULATION:
You can animate or change a picture by making different frames for it, and then replacing the image source on different mouse events. These "frames" don't need to be still frames, either: you can replace a .png with a .gif so something moves only when hovered over... or use a non-looping .gif to play an animation once when clicked on. While your frames don't *need* to be the same size for this to work, I would recommend making them the same size or pre-defining its size with style, as an element changing in size can make other things on the page bounce around. Remember to be considerate, too: while you could make a jumpscare with this, that's not nice to do... and you should really be careful not to make the image flash, change colors too rapidly while cycling through frames, or makes the whole page shake quickly (ex. from looping through very differently sized frames), because you could trigger someone's epilepsy, give them a seizure, and kill them in real life.
As another note, while the code above works (when you replace all image sources with your images of choice), it's kind of a crude way to do it. Instead of defining all the frames inside of the image element itself, you could link those mouse events to a function and do this with javascript, which gives you more room to do extra things with it, such as also change a picture back when clicked on again, add a title attribute after changing it... and while you can do it with html alone, it's in this case actually much more straightforward to animate images with css, which also gives you ways to add other effects, like a fade transion, flip, shake, or spin. (But this is not a css tutorial).
HTML COMMENTS:
The average visitor to your website is very unlikely to look at the page source or open the inspector on your page and see what you've written in your html files. But you can leave an easter egg there for anyone who does! There are two main ways to do this: the first is to add a comment. Every coding language (including html, css, and javascript) has a way to mark something as a comment, which should be ignored when the code is run. Usually, people use comments to annotate their code with explanation or notes, but you could put whatever you want in there!
The second way is to add hidden to an element, which will hide it and everything inside of it. You'd still find it if you looked at the html of a page, but it wouldn't load on the page itself. Because it otherwise looks like any other regular element in the code, it might be harder for someone to notice than a regular comment, but it has other uses, such as hiding an element until a certain condition is met that removes the hidden attribute from it.
My final tip is to not make your easter eggs *too* hard to find: if they're hidden too well, chances are that no one will ever actually see them. The less likely someone is to stumble on something by chance, the more rewarding it is to leave clear clues there's something to find, for example by changing mouse styles, hover effects, or hints in plain text. Don't make these hints too vague or obscure either: even your smartest visitors are not mind-readers.
That's about it for tricks! This tutorial was a little less specific than other tutorials on the page, but the bits of code here are meant more for reference to help you build your own easter eggs than to give you premade elements, as the real fun is in coming up with your own ways of pranking or rewarding your visitors. Most up there can be used in combination with each other as well (or even with other tutorials from this page!) to aid your elaborate schemes. Like The other tutorials, there's a preview page showing some of these techniques in action, all annotated in the source code of that page, so check that out if you want to get a clearer idea of how these are supposed to work!
To do:
- update oc pages with a better gallery code
- make a fun randomizer to use as example page
- unfortunately, learn javascript
Thanks for looking at my codes!
Check out these other websites for more fun web codes:
- sadgrl.online
- The Cave Of Dragonflies (+ Favorite Pokémon Picker code)
- Touhou Character Sorter code
- more TBA